by admin | Sep 20, 2024 | burgers, cooking, food and drink, food preparation, recipes
-
Femail’s Ellen Manning shares tips on crafting a delicious smash burger from scratch at home.
-
READ MORE:
The surge of the smashburger
The golden era of the quarter-pounder has faded away, as British folks now have a stronger affinity for the smashed burgers.
continuing to surge
.
For many years, hefty burgers have been a favorite among famished British people, but nowadays, a notably thinner alternative has started to catch their attention.
establishing itself as one of the UK’s favorites.
Even though they aren’t new, our affection for them is highlighted through social media, with countless posts devoted to these straightforward yet flawless items.
Burgers are everywhere, with big hitters not just in the capital but across the country, attracting regular queues of aficionados at restaurants and shops as well as street food vendors.
The irresistible combination of a crunchy exterior, slim meat slices, and overall gooey deliciousness stands unmatched.


The key is in the Maillard reaction – named after French chemist Louis Camille Maillard, who discovered that when amino acids and reducing sugars react, they create a distinctive flavour in the browned result that gets our taste buds tingling in a way that’s strangely addictive.
Getting this effect in a burger requires ample heat, high-quality meat, and the signature ‘smashing’ method where clumps of ground beef are pressed and flattened until the patty becomes incredibly thin, achieving the crispy edge everyone adores.
We probably don’t have massive machines at home built for smashing hundreds of patties on an assembly line to satisfy avid burger enthusiasts.
However, we can create some of our own using appropriate strategies. The starting point is the meat itself.
It’s agreed upon that the meat needs to be of good quality. Generally speaking, people prefer a fat-to-lean meat ratio of 30:70.
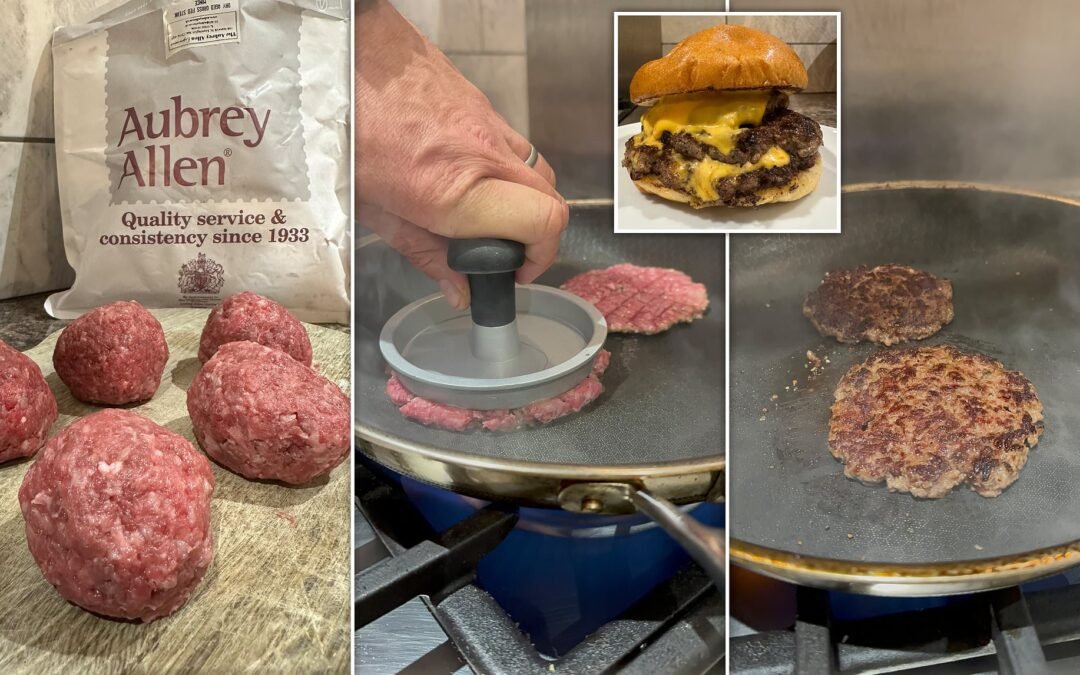
Tom Warwick, the mastermind behind the popular burger chain MeatCastle, takes things up a notch. He attracts throngs of eager customers from all over the nation to his mobile eatery known as the Fortress of Burgers. Tom’s secret formula involves a blend with proportions not exceeding 25:75, processed using a 4mm grinder, emphasizing that aged fat enhances flavor.
‘To get the perfect blend, you should use double-ground high-fat beef mince; chuck works well for this, along with some brisket, flank, and rib meat,’ recommends Tom Robinson, who serves as the group head chef at Libertine Burger – an additional accolade-winner.


However, since I’m not a seasoned burger chef but merely an ordinary home cook, I lack both the time and means to get a custom meat mix prepared by a butcher for me personally.
Fortunately, I don’t live too distant from renowned butchers Aubrey Allen, known for making their own burgers and burger blends. So, I head over quickly and request the finest ground meat they have to craft my custom smash patties.
They sold me a substantial portion of their dry-aged, grass-fed ground beef, telling me that although experts may have their preferred method, the fat content here is sufficient for the task and should work just fine.
Heading home, I stop to grab a few brioche rolls and some classic American “sliced” cheese.
Since some folks enjoy having 4,798 toppings on their burgers, this focuses on the smash patties, hence we’ll keep things minimalistic.
I sought advice from the burger connoisseurs and learned we should shape the ground meat into patties. According to them, adding an egg isn’t necessary.

Robinson informs me that seasoning is meant for cooking, not required in the initial mixture. I’ve convinced both him and Warwick to share some cooking advice—largely so I can relay this information to my hamburger enthusiast spouse, who’s much more daring when flattening patties on a heated grill compared to myself.
The secret lies in achieving the perfect temperature—not too high and not too low,” explains Warwick. Given his extensive experience and the sheer number of burgers he has handled—reckoned to be in the hundreds of thousands—he likely knows precisely what degree of heat is required, though we can only speculate.
‘Therefore, we turn the stove to maximum heat, place a pan on it, and wait until it looks like it’s sufficiently hot.’
“Place one ball onto the grill, then flatten it as much as possible,” instructs Robinson.
‘Since what you’re searching for is that crispy exterior, that delightful Maillard reaction.’ We pursue it.
As soon as the meat touches the skillet, the sizzling begins, growing increasingly intense and assertive as we apply pressure to flatten the patty.
Fortunately, we have a burger press tool that comes in handy, and before long, the meat transforms into a flat pancake-like patty. While some advocate smashing the patty for about 90 seconds, Robinson advised me to refrain from meddling too much and let the meat be undisturbed until a nice, crispy crust forms.
How to prepare a smashed burger
Serves Four
500 grams of ground beef (having a ratio of 30% fat to 70% lean meat)
Oil of your choice
Salt to taste
American cheese
Burger buns
Extra toppings of your preference
Method
1. Slice the burger buns into halves, toast or grill them, then set aside.
2. Split the ground meat into four portions, then shape each one into balls, adding plenty of salt along with seasoning options according to preference.
3. After your pan becomes sufficiently heated, add one portion of the mixture into the pan.
4. Quickly cover with baking parchment and then use a smaller pan to ‘smash’ the mince down, allow to cook for two minutes
5. Take off the baking parchment and flip the patty over, pressing down with a spatula.
6. Arrange the burger ingredients inside the buns using your preferred toppings.
I get why you’d notice a difference as it cooks, particularly when the Maillard reaction begins and alters the aroma. I can’t say exactly how long we were at it because my palate picked up on that transformation too. Plus, I was trying hard to manage the automatic saliva production triggered by the delightful scent of cooking meat and the anticipation of achieving perfect smash burgers right in our home kitchen.
I would readily enjoy eating it right away—just the meat. However, my spouse has observed numerous professional burger chefs at work, so after generously sprinkling it with salt and pepper, he emulates their technique by placing a slice of cheese atop the patty while it’s still in the pan. Then comes the brioche bun lid (Warwick emphasized that a quality burger bun is essential, hence I bought Tesco Finest ones). Finally, we cover everything with a cloche for the bun to softly steam.
No, I’m not sure why we have a cloche as well, but it turns out to be a useful item in the kitchen when you’re making a smashburger without wanting to stand in line outdoors during chilly weather.
At this stage, the pan might be getting too hot and the smoke detector is likely to activate soon, yet we remain unfazed. We’re nearly achieving burger nirvana.
As a kid, I would heap the completed burger with plenty of pickles, extra cheese, crispy onions, lettuce, tomatoes, and anything else I could get my hands on. However, although Robinson mentioned earlier that the beauty of smash burgers lies in their flexibility—where you can pretty much do whatever you like—he also emphasized that: “a great smash burger truly needs nothing more than some beef, a bun, and cheese.”
It doesn’t really require anything else.” I only mildly stray from his guidance, finding it impossible to skip adding some ketchup and burger mustard, then digging into my meal.
It’s fantastic. I’m curious if we’re not quite at the level of the experts yet, but these burgers definitely lack fatty patties. The patty—or should I say, patties, since we generously stuff each bun with two—has a delightful crispness and crunch to it.
The meat is bursting with flavor, enhanced by the classic process that gives seared steaks their deliciousness and makes smashed burgers so popular. You’ll wish it lasted longer, just like with the finest hamburgers.
This serves as a reminder that the finest meals frequently turn out to be the most straightforward ones. This explains why smash burgers continue to remain popular.
Read more
by admin | Aug 15, 2024 | food preparation, foodies, healthy eating, recipes, salmon
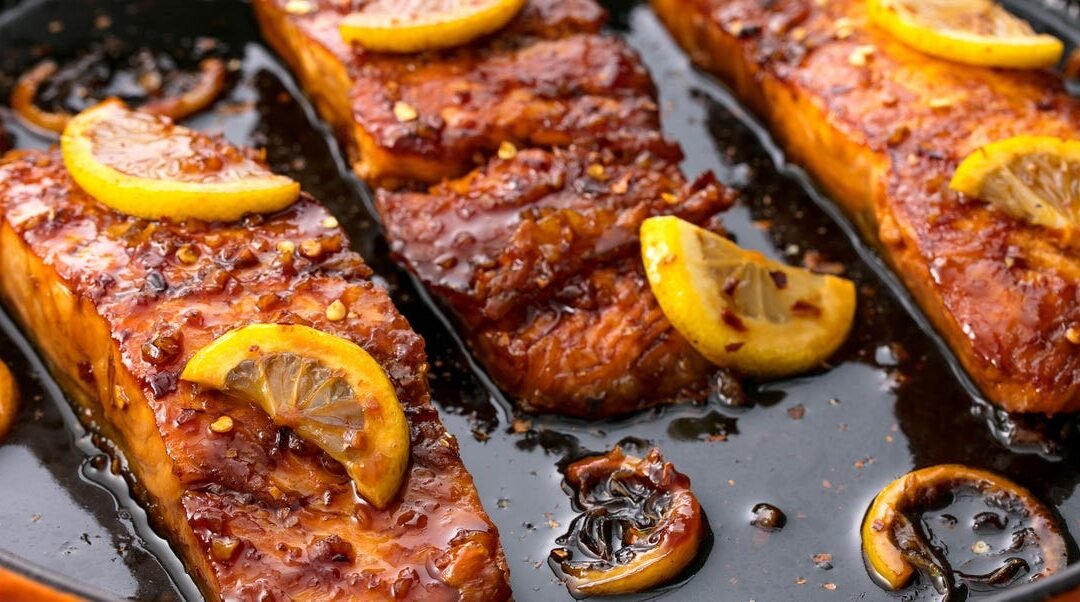
I could share all the things I adore about this honey-garlic salmon, but the truth is that this recipe became one of our favorites.
top recipes of 2022
And an enduring, trusted classic that resonates with SANGGRALOKA readers needs no further explanation. This umami-rich, sweet-and-savory dish speaks volumes.
salmon
is fast and simple enough for
weeknights
(prepared in less than 30 minutes), yet elegant enough for special events. If you’re a
seafood
Beginner, don’t worry: Cooking fish may appear daunting, but armed with my best advice, you’ll master it swiftly. Below is all the information required to nail this salmon meal:
Ways to Prepare Honey-Garlic Glazed Salmon
INGREDIENTS
•
Honey-Garlic Glaze:
Darling, blending honey, low-sodium soy sauce, freshly squeezed lemon juice, and red pepper flakes yields this easy yet delicious glaze. To keep the glaze from becoming too salty, use low-sodium soy sauce; however, feel free to experiment. You could substitute the lemon juice with lime, increase the spiciness with Sriracha, omit the red pepper flakes entirely if they’re not your thing, or include some finely grated ginger for extra zest.
•
Salmon Fillets:
The typical package of pre-portioned supermarket salmon usually does not contain leftover pinbones, but it’s always wise to verify this step. To inspect for bones, lightly glide your fingertips across the fish’s skin until you detect a small protrusion. Then, with a set of cooking or fishing forceps, securely hold the bone and extract it following its natural alignment.
•
Garlic & Lemon:
Slices of lemon and freshly grated garlic serve as the final touch for this recipe. For those who really love garlic, you can add extra according to your preference.
STEP-BY-STEP INSTRUCTIONS
To start, mix all the components in a little bowl until they blend together nicely. Our special honey-garlic sauce uses just a handful of basic items: honey, reduced-sodium soy sauce, lemon juice, and red pepper flakes for some spiciness. Not only is this straightforward sauce incredibly tasty, but it’s also very adaptable, so be sure to try it out and tweak according to your preference.

Next, warm up some oil in a frying pan until it’s very hot but not smoking. Ensure that the pan is scorching hot (yes, really) and evenly covered with oil across the base. When the fish goes into the oil, expect an audible hiss; otherwise, your pan needs more time to reach temperature. Pro tip: As soon as the pan gets extremely hot, so does the oil. Place your fillets gently away from yourself to avoid spattering. Put the salmon skin side down first, followed by seasoning with salt and pepper (though you could sprinkle these spices even prior to adding the salmon to the pan). Let them cook till they turn dark gold, then carefully turn each piece over and pour additional oil around them if needed.

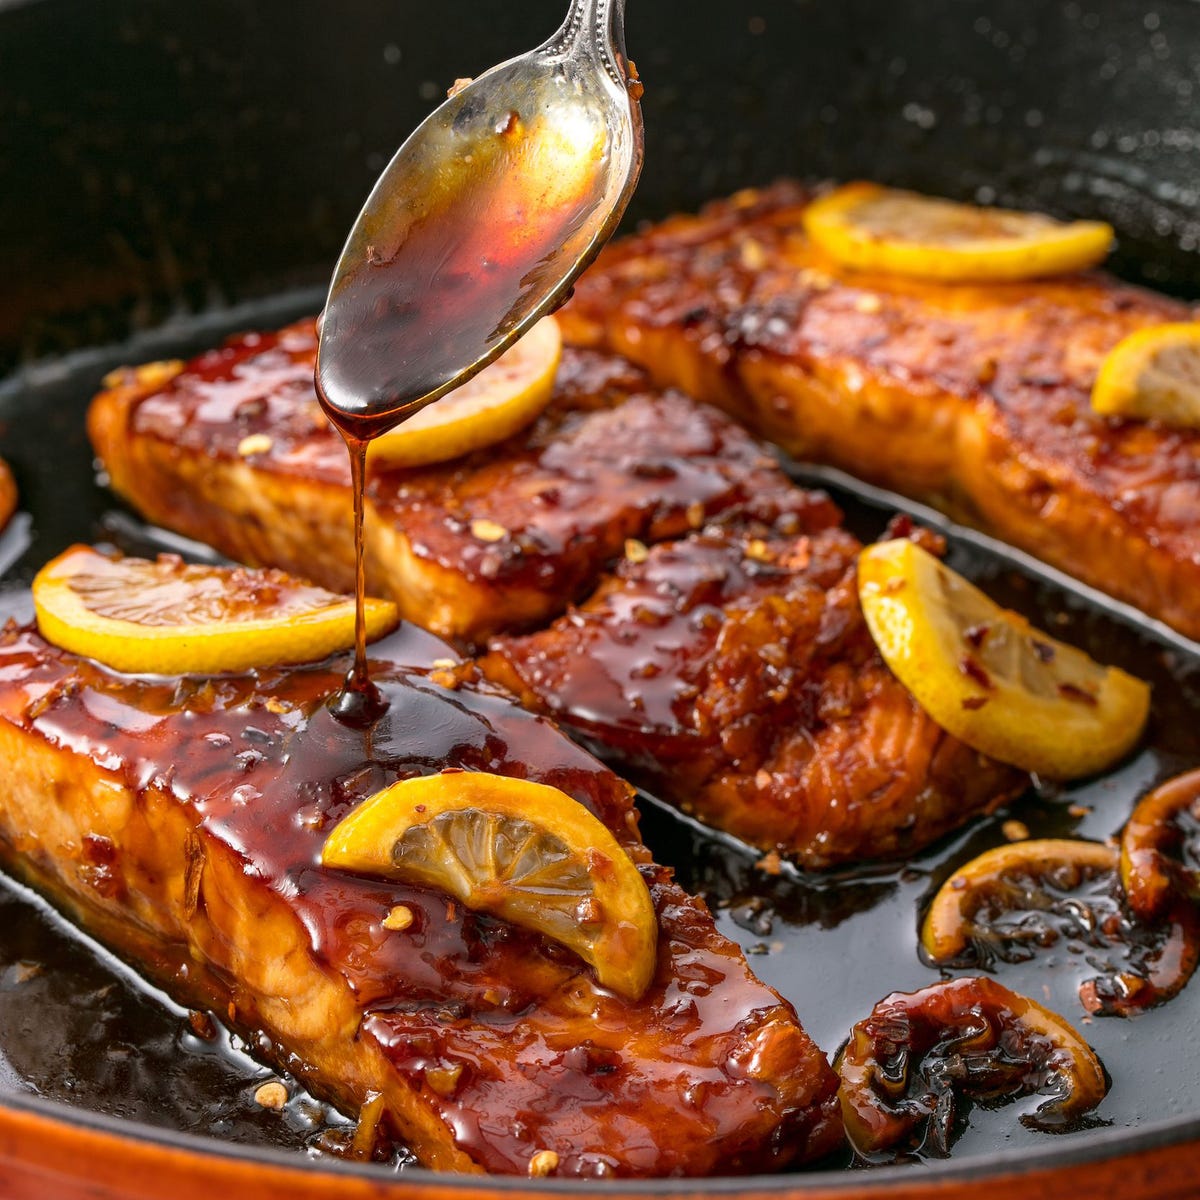
Place garlic in the pan, then one minute later, add your honey mixture along with the cut lemons. Continue cooking until the sauce has decreased by approximately one-third.

Once the salmon is done and the sauce is thickened, spoon your glaze over the salmon until it coats every fillet very well. Add any reserved sliced lemons as a garnish, then serve!

Full list of ingredients and instructions can be found in the recipe below.
Recipe Tips
•
How to cook the best salmon.
Allow the fillets to cook without interference for several minutes. This technique, combined with using high heat, helps form that yummy crust. Once around three minutes have passed, carefully nudge an edge of one fillet with a spatula. Should it come off effortlessly, it’s prepared correctly; otherwise, let it sit longer until it does release smoothly. Turn them over next, continue cooking briefly till the skin turns crispy and the fish becomes fully cooked throughout, then serve!
What To Serve With Honey-Garlic Glazed Salmon
This dish goes well with many side options, such as
roasted asparagus
,
bok choy
, or any of our beloved items
side dishes for salmon
, but I especially love it with
coconut rice
to absorb all of the tasty honey-garlic sauce.
Storage
Should you happen to have any remnants, store them in an airtight receptacle within your refrigerator for as long as three days.
Yields: 4 servings
Prep Time: 5 mins
Total Time: 20 mins
Ingredients
-
1/3 c.
honey
-
1/4 c.
low-sodium soy sauce
-
2 tbsp.
lemon juice
-
1 tsp.
red pepper flakes
-
3 tbsp.
extra-virgin olive oil, divided
-
4
6-ounce salmon fillets, gently dried using a paper towel
-
Kosher salt
-
Freshly ground black pepper
-
3
cloves garlic, minced
-
1
lemon, sliced into rounds
Directions
-
In a medium-sized mixing bowl, combine and whip up the honey, soy sauce, lemon juice, and red pepper flakes using a whisk.
-
In a big frying pan set at medium-high temperature, warm up two spoonfuls of oil. Once the oil becomes hot without starting to smoke, place the salmon with the skin side facing downward and sprinkle some salt and pepper for seasoning. Continue cooking until the salmon turns darkly golden, which should take around six minutes, before flipping it over and adding another spoonful of oil.
-
Add garlic to the skillet and cook until fragrant, 1 minute. Add the honey mixture and sliced lemons and cook until sauce is reduced by about 1/3. Baste salmon with the sauce.
-
Top with cut-up lemon slices before serving.
Glazed Salmon Variations
![]()
Made This?
Let us know how it went in the comments below!